
Just in time for Halloween- An Angry Bird costume making tutorial!
I have had a few requests for a tutorial and pattern for the angry birds costumes I made for my friends at the start of the year. I am going to attempt to put the process down for making the red, black or blue bird (basically, the round shaped birds) in as much detail as I can remember. If you've chosen one of the others, the patterns can be adapted for whatever shape you like.
Here are some pics of the finished birds for reference:


I have included some pics in the tute, but since I didn't photograph each step as I went, I've instead tried to describe each step carefully.
*disclaimer* I am not a professional- this tutorial outlines my novice steps to get there.
Please read through all the instructions before starting. Hope it helps!
Materials:
- Butchers paper/newspaper, pencil and string.
- polyester, or similar stretchy fabric (but not jersey- too stretchy) in desired colour. Metres/Yards will depend on size of wearer. You'll need enough for the front and back of the costume
- small amount of white fabric for belly (grey for black bird) choose something snuggly
- muslin or light white fabric for lining, for front piece of costume only.
- felt in white, black and yellow (add blue/purple for black angy bird)
- vlisofix/heat and bond or spray glue if you're game (for attaching the face)
- light poly fill (toy stuffing). LOTS (1-2 bags per costume)
- sewing machine and thread
- 8 hours of your time. :) (if you're a novice! ha)
Step one: measure your Angry Bird
Take a measurement of your angry bird from the top of the head to just below the bottom, or desired length of costume. Add 6-8 inches for room above the head. This measurement is the diameter of the circle shape for your bird pattern.


Step two: draw your pattern outline
Take a large piece of butchers paper or tape pieces of newspaper together.It will need to be big enough to draw a circle with the diameter you just worked out in step 1.
To draw the circle pattern as accurately as we can (on a big scale) we are going to make a compass using a long piece of string and a pencil.
Tie your string or piece of ribbon to the pencil, close to the lead.
Take your measurement (diameter) and halve it (radius). Cut your piece of string to the length of the radius.
You are ready to draw your circle!
Draw a dot somewhere in the middle of your butchers paper. Place the loose end of the string over the dot and ask a friend to place their finger over it and hold it down carefully.
Take the pencil and stretch the string so it is taut. Put pencil to paper and carefully draw a circle.
This is your basic shape, from here we will modify it to suit the characters.
Step 3: sketch some details onto your pattern
Shape the head:
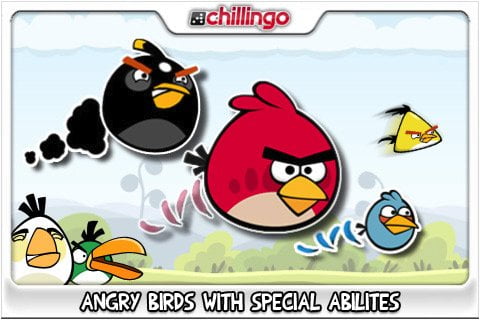
To give the head some shape, sketch some hair and taper the top part of the circle so it doesn't look completely round on top. Use this picture of the Angry Birds team to help you get some ideas:
Provide arm and face holes:
Next we need to draw some holes for the wearer's face and arms. Have a look at this picture to see how these holes work in action:

Use a cereal bowl to sketch a hole for the costume wearer's face and draw it on your pattern towards the top of the costume.
Draw two long vertical rectangles for the arm holes. The arms will be more at the angry bird's hip level as they come out in front. To check, hold the pattern up to the wearer and line up suitable face and arm holes. Draw in.
Draw tummy panel:
Sketch in the tummy panel using a curved line.
Draw the face:
Sketch the face onto the pattern. This will help you work out the scale. Draw eyes, a beak and angry looking eyebrows. If you're making the black bird, you'll need a piece on the head for the yellow 'spark.'
Trace the face pieces onto a separate piece of paper to use as a pattern. If you would like your face pieces to have a black outline (like the cartoon drawings of the Angry Birds), cut out the eye and beak pieces and draw new pattern pieces a little bigger for the black outline. Here's a pic of the finished face pieces to give you an idea.

Your pattern is now ready to use!
Step 4: Cut face pieces from felt
Pin your face pattern pieces to your chosen felt colours. Cut out carefully. If you've chosen to include the black outline, you can cut a hole in the eye pieces to create 'eyeballs' when you place the eye piece over the black outline piece. Fuse these pieces together with fusible webb for ease of application to the costume front later.
Repeat for the beak pieces.
Step 5: pin pattern pieces to costume fabric
To give you an idea of how the costume works, it's basically a pillow form on the front with a piece of fabric that goes over the back. Keep this in mind when you cut out your fabric.This is how I did it to save time and energy, but you can use another method that suits you:
Cut your piece of polyester fabric into two pieces for the front and back of costume
Lay your piece of muslin/cotton (for the lining) on the floor, wrong side up (though it doesn't matter as no one will see it)
Lay your front piece of polyester on top, right side up (bear with me)
Lay your back piece on top, right side down.
Place your pattern on top, right side up. Pin through all three layers of fabric all around the pattern. Cut out.
Unpin the pattern and three layers, setting aside the back piece of the costume.
Mark the arm and face holes, the tummy panel and the location of the face pieces onto your front and lining pieces using chalk or your prefered method.
Cut the tummy panel from your pattern (or trace onto new butcher's paper) and pin to your white snuggly belly fabric (or grey if you're making the black bird). Cut out.
Step 6: sew tummy and face to front piece
Sew the tummy panel onto the front of the costume. To do this, I folded the fabric of the curved edges under 1/2 an inch and topstitched around the whole thing, enclosing the raw edges of the front piece where they lined up with the belly at the same time. This involved guesswork so I'm sure you can figure this part out/do it neater than I did!
Using fusible webb, iron your felt face pieces onto the front of the costume. Use the pictures above to work out the positioning. Iron on the felt for hair piece if necessary (for the bomb's spark)
Here's the face and stomach parts on my costume. (ignore the face and arm holes, we'll do that next).

Step 7: Create holes for arms and face and stitch front piece to lining:
We are going to join the front piece to lining by stitching the face and arm holes together first- right sides out (it will make sense in a bit.)
Here's how I did it:
Take your front piece and find the circle you have drawn for the face. Pierce a hole in the centre of the circle and cut slits from the centre, like you're cutting a pie. Stop each slit a little before the edge of the circle.
Repeat with the lining piece. (NB: to make this a little easier, I fused a piece of interfacing to the circles before cutting the slits. It made it stiffer and easier to work with).
Turn slits on the both pieces to the inside of the costume and press. Line up the circles and pin together around the circle, catching all raw edges in between the layers as neatly as possible.
Top stitch close to the edge, enclosing the 'flaps' you have cut. I Hope that isn't too confusing - I can't explain it any other way and there wasn't anything online for this method that I could find.
Repeat this process with the rectangle arm holes but make the slits like triangles and trapezoids (google it) and stitch together in the same way.
If you'd like to try an alternative method for making the holes, one of my readers Gloria emailed this suggestion to me:
" I put the face (red fabric) and lining (white fabric) tog; sewing on the right side of face - I place a piece of white fabric, and a piece of fusible interfacing (sticky side up). Then, I sewed the lines of the holes, cut inside fabric, graded seams, and then turned the facings under; ironed the sticky side down, then used stitch whitchery (http://sewing.about.com/od/fusibles/ss/fusibleoptions.htm) to stick down the facing."
Here's a pic of Gloria's method:

I hope one of these methods works for you. Thanks for your suggestion Gloria!
After stitching the holes, stitch the front piece and lining together around the perimeter of the costume (still right sides out). Make sure you leave a gap for stuffing at the bottom. Make sure you can get your arm through the hole as you'll need to get the stuffing into the top of the costume easily. NB: don't worry that you can see this stitching, these stitches will be hidden when you sew the front and back pieces together in a minute.
Step 8: Stitch front piece and back piece together:
Sew the front piece to the back piece right sides together all around the perimeter, making sure you leave a big enough gap at the bottom between the front piece and the back piece to put it on easily.
Make sure your seam allowance is wider than the one you used for sewing the front piece and lining together so you can hide these stiches in the seam.
Turn your costume right side out and press the seam nicely.
Turn under raw edge of back piece at the bottom of the costume and top stitch to make it look neat.
Step 9: Fill your costume
Stuff your front piece with polyfill, using small pieces at a time to avoid lumps. Be careful not to overfill it as it will be very heavy and hot! Slip stitch the gap closed.
Step 10: put on your costume and crash into pigs, walls and ice.

Yay!
Gloria sent through a lovely pic of her two Angry Birds. Here they are for you to enjoy:

I hope these instructions have been helpful for you. Please send me some pictures if you make costumes using these instructions as I'd love to see them.
Happy Halloween!
xx


