Showing posts with label purse. Show all posts

First market stall - what I have learned so far

I have been super quiet on my blog in the last few weeks as I prepare for my first market stall coming up in 1 week + 1 day. I have learned a lot from the process and thought I'd reveal some of these things in order to perhaps help anyone else there thinking they're ready to have their own stall:


Things I have learned in preparing for my first market stall
  1. Yes, booking yourself in for a market stall in 1.5 months will be a good motivator to get organised. However.....
  2.  1.5 months is nowhere near as long as you think.... or enough time to build stock from scratch
  3.  Faffing around making a logo for 3 weeks is not encouraged and should be considered before you even book a market stall
  4.  Cutting fabric and ironing on interfacing will be the bane of your existence and takes 3 times longer than you expect it to
  5. Deciding to do a market stall during a time when you have two away trips for work is not advised
  6. Drinking wine while sewing at night is not a winning combination
  7. Buying every pink piece of fabric you're attracted to will result in a very pink market stall, leaving you scrambling one week out to make things in blues, greens and purples
  8. organising business cards and paper bags for your goods in advance will help you to stress less.
Ok so during this whole process I have taken things pretty much in my stride and things have been going pretty well. That is until I realised last night just how much pink I have in the collection and not a lot else. Eeep!

I have a little time left and some ideas, along with the support of my amazing husband who even offered to iron on interfacing for me which is so sweet (he has no idea how dull it is...).

So I better get back to it, here's some pics so you can see where I'm at so far (pink land, apparently!) Thanks go of course to Karl for taking pics and making my things look pretty!

cosmetic bags


vinyl covered coin purses


14" cushions


So that's most of what I have so far. I also have a few pencil cases and I'm trialling some headbands at the moment. Hopefully I can get everything done in time!

wish me luck!

Pencil cases/make up bags

Today I'm writing this post while away in Western Australia for work. With the market stall coming up in two weeks (argh!) the week long trip away wasn't exactly the best timing, however I have made good use of my spare time by spending 2 hours fusing interfacing to 17 sets of purse pieces. Now they're all ready to sew up when I get home. I love that the boring part is now out of the way and I get to sew! Hee hee.

Before I left I made some prototypes of the purse styles I'd like to make for the market and cut lots of fabric. I made a couple of pencil cases which could also be used as make up bags using elephant printed fabric I bought on my trip to Thailand. I also made one using some of my favourite kokka fabric which has framed ballerinas and cute Paris icons like the eiffel tower and arc de triumph.

Here is a pic of the front:


I'm pretty happy with this part but not as happy with the back. I thought it would be sweet to include one of the Paris icons on the back of the case. I found some sweet little heart eyelet lace and put r together. All was fine until I boxed the corners of the case and lost the bottom part of the eiffel tower. :(


Oh well, it was a fun experiment and I still love it overall. Ah the perils of experimental sewing! Fun.


Purse Week- a lemon squeezy home

I just stumbled across this fun looking purse contest on a Lemon Squeezy Home. Since I am a lover of purses and bags (mostly because I can't sew much else!) I think this would be a good one for me to have a go at to test out my creative bag making skills.... if I have any!


Photobucket

The entries from last year were just gorgeous! From the top 10, I liked these two the best:


Bowling Bag from Lifestyles with Love
 How cute are the pigs and apples? I had a look at the Lifestyles with Love website and there are so many cute little purses with gorgeous Kawaii fabrics and Zakka prints. Sweet!


Grey clutch lbg studio

 
Beautiful fabric and style. I love a clutch. So chic!

I might have a go at making a clutch too. Maybe with some pleats and a zippered section. We'll see!

Pretty things for ballerinas- part 2

I have finally finished sewing 10 pretty things for ballerinas for my friend Kylie. She wanted a few special little things to give to the girls in her dance studio who were trying their best. You can read about how it started here in part 1.

For this project I bought a few contrasting ballet themed fabrics so each piece would look a little different. In the end I made 5 ballet bags for shoes and 5 little purses for hair ties or coins.While all the ballet bags were made using this tutorial for making a drawstring bag, I tried to make each purse a little different to the next.

Overall I'm happy with them and hope the little girls like them too! Here are some pictures of the whole collection and each individual piece:

collection- 10 pretty things for ballerinas


ballet shoe bag- Kokka fabric

ballet shoe bag, Kokka fabric


ballet shoe bag- Kokka fabric


ballet shoe bag

ballet shoe bag- Kokka fabric


zippered coin purse, kokka fabric


hair ties and clips wallet


hair ties and clips wallet

zippered coin purse- kokka fabric


small make up bag

I also wanted to make something special for my friend Kylie who has always been so supportive of my sewing. I used my favourite ballerina Kokka fabric to make her a tote bag and popped all 10 things inside for her. she really liked it and wants me to make another 15 for her girls at Christmas time. You can find a tutorial for making this tote bag by following the link.  Here's a picture:

tote bag
 I had fun making my first little collection. I also enjoyed taking the photos and processing them myself, but I really have a lot to learn about that!

I'd love to see some links to any of your collections!

xx


attaching a flap to a zippered purse

I love making little zippered purses and tend to make more of them than anything else because they are pretty easy and the variations are endless.

I have always liked those cute little clutches which have a flap covering the zipped section and thought I would have a go at making one. I had a bit of a think about it and decided there were two ways I could try to attach the flap. I could either sew it as a layer attached to the zipper, or sew the completed flap to the outside fabric.

The first attempt I made was for a vintage style clutch. here is a picture so you can visualise the process a little better:

Outside of clutch

inside of clutch

To attach the flap in this example, I sewed it to the zipper tape at the same time I sewed the lining and outside fabric to it, so it's caught between the layers.


I was fairly happy with how it turned out but it was a little fiddly to put together as the parts didn't line up perfectly (self devised pattern = no guarentees). Overall I love this little clutch and would definitely use this method again.

Next time I made a little zipped coin purse I decided to try a different approach- to make the flap for the purse and attach it to the top of the back fabric piece before sewing it to the zipper tape. In some ways this was easier as you could attach the flap to the back piece before sewing it to the zipper tape and there was less bulk in the zipper tape, but the flap doesn't sit perfectly unless the snap is there to hold it in place.

Here are some pics of the purse for you to see for yourself:

Coin purse using kokka ballerina fabric

back of coin purse

inside

While this method worked quite well, I think the other way is more functional and I'd be more likely to use it again in the future. 

I think I have one more method to try which I'll write about when I get around to it. In the meantime, if you have any suggestions I'd love to hear about it!

xx

Linking up here!


Join  us Saturdays at tatertotsandjello.com for the weekend wrap 
 up           party!


Cute elephant fabric pencil case

At the moment I'm in a phase where my sewing can't keep up with my fabric purchases. I regularly have to ban myself from buying more fabric so I can focus on creating with what I have.


This rule went out the window recently when I came across a gorgeous pink and white elephant fabric that I couldn't resist, but I decided if I was going to buy it I would have to sew something up immediately to make up for being naughty. :)


So here is a little flat bottom pencil case I made using the sweet elephant fabric. I love it and think it will be a good addition to my future market stall, whenever that happens!


flat bottom pencil case
 For this pencil case, I decided to create some fabric zipper ends using a technique I learned from Keyka Lou's patterns. They give the zipper ends a neat and professional look which I like. There is a make up purse tutorial from Flossie Teacakes which also explains how to use fabric zipper ends if you'd like to have a go too.

To make it stand up on its own I boxed the corners. This is a handy trick you can use to give your purses, pencil cases and totes some body and structure. It's worth the effort to use them, even though it's time consuming and a bit of a pain to get them even. You can have a look at this tutorial from craft apple on making proper boxed corners with a ruler. Oooh, preciseness.... :)


Here is a picture of my elephants in their 'natural' habitat.... a grassy patch at the side of our apartment block. hee hee. 


Who doesn't love elephants?


xx

Market stall beginnings

Part of the reason I started this sewing blog was to try and hold myself accountable. I am queen of saying 'I'm going to do this or that' then getting distracting by something shiny or furry and forgetting all about it.

Part of the plan for this year was to sew enough things to have my own market stall at the end of the year. I like making baby and kids things and sewing things for adults and for the home, so I will probably need to have two different stalls so things don't get confusing. I'll have to read more about this as an idea so if anyone has any tips about market stalls, I'd love to hear them!

Anyway, I have started getting my 'collection' underway by sewing some bags and purses. It has been good to wear down my stash of fabrics as it means I now have some space to go out and buy some more! Yay!

Here is what is have made so far:

vinyl covered cosmetic bag

pleated wristlet purse
small satchel (pattern by keyka Lou)


Let me know what you think, i'd love to hear your feedback! All comments and suggestions welcome!

Lindsey. xx

zippered purse experiment

I like making zippered purses for lots of reasons. They're cute, handy and I can complete one in about an hour which appeals to my impatient/short attention span side.

Recently I was out shopping and came across a little zippered purse with a front zippered pocket. I had a good look at it and figured out how I could make it myself and save $16.
I had a fat quarter of cute kokka fabric at home and some leftover denim I have been wanting to use for awhile. I think they suited the project really well.

Here are some pics of the end result taken by my clever husband.

front

back
inside main pocket

inside front pocket

The zippered pocket at the front turned out pretty well but is a little crooked! 
I like the little applique ballerina on the back. She's from another part of the same piece of fabric, and since I couldn't fit her on the front I included her on the back.

appliqued ballerina

I think it's quite a versatile style and would probably look good as a long pencilcase. I think next time I'll also experiment with fusible fleece or some heavy interfacing to give it more body, and include a strap. I think if I were to make pencilcases I'd probably need to use metal zippers for extra strength, although I am not sure how you sew a metal zipper without breaking a needle.... any suggestions?

What do you think? Any comments or feedback would be very welcome!

tutorial: mini coin purse

Yesterday I was feeling bored so I decided to have a go of making a mini coin purse. I love little pleats in things, so I based the pattern of the coin purse on this pleated pouch from skip to my lou.


I have lots of small bits of favourite fabric lying around (some call it hoarding...) so these coin purses are a way I can use them up. They also make cute little gifts.


I made my own pattern for this so naturally I was quite surprised when it turned out ok! This is quite a long tutorial with lots of pictures, as these were the kind that really helped me when I was learning. Any feedback on the instructions are welcome! 


Here is a pic of the finished purse.


Materials needed:
- feature fabric
- purse top fabric
- lining fabric
- iron on interfacing (optional, depending on fabric thickness)
- zipper (any length, you'll be cutting it anyway)
- paper, pencil and ruler
- pins, machine, coordinating thread.


Seam allowance: about 1cm (about 2/5ths ") I just use the edge of my foot most of the time. I don't think it makes a huge difference in this project.


Step 1: make your pattern (super easy)
For the top of the purse, draw a rectangle 3.5cm (1.5") by 12.5cm (5")
For the purse body, draw a rectangle 7.5cm (3") by 15cm (6"). Round off the bottom corners with a gentle curve.
for the purse lining, draw a squarish shape, 10cm (4") by 12.5cm (5")
Your pattern should look like this (minus the shadow of my cat Claude's face) Apologies for the dodgy picture!
make your pattern
Step 2: cut out your fabric
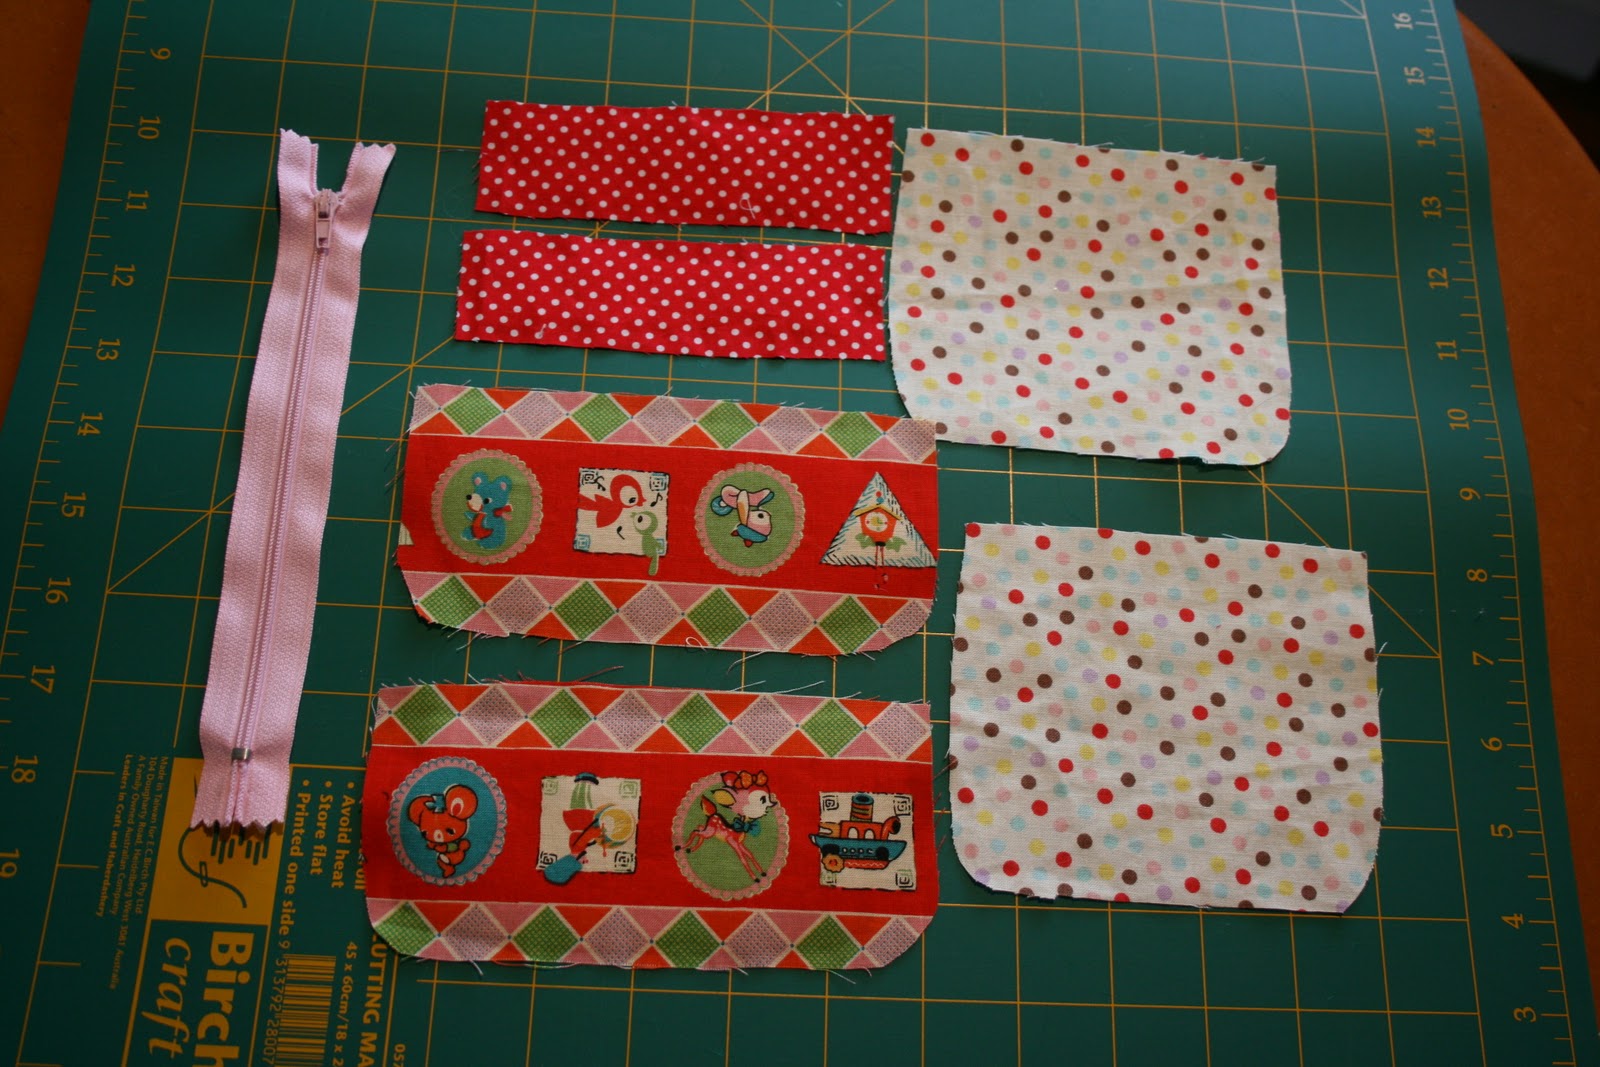
Pin your pattern pieces to your chosen fabrics and cut out two of each for the front and back of the purse. I find it easiest to fold the fabric in half with right sides together and cut the two pieces out at once using a rotary cutter. it means that the two pieces should match up properly when you're sewing them together later.


cut fabric & zipper


step 3: add interfacing (optional)
At this point, I used some iron on interfacing on the purse top and body to give my purse some extra stability. These fabrics are fairly light cotton and can be a bit floppy, but if you're using heavier fabric like linen or denim you might not need it. I make the interfacing pieces smaller than the fabric pieces so it doesn't add bulk to your seams.
add interfacing if necessary
step 4: make pleats
Take your purse body pieces and some pins. You'll notice the purse body is a little longer in length than the purse top. This is to allow for the folds you make in the fabric to create the cute little pleats. After you've made your pleats, these pieces should be the same in length, so keep the pleats pretty small.
To make a pleat, you basically fold the fabric on itself and pin it in place wherever you want to pleat to sit.  I have 3 pleats in my purse, all going in the same direction. Experiment with it until you're happy.
Repeat with the other piece.


make 3 pleats, pin in place
Important: After making and pinning your pleats, grab one of your purse top pieces and check that its length is the same as the length of the purse body. the purse body will have a little curve in it due to the pleats, but you can stretch it a little to line it up. 


To hold the pleats in place, give them a little press with your iron and stitch across the top, using a small seam allowance so you don't see the stitches later on. Press again.


stitch across the top of the pleats to hold in place
Step 5: attach purse body to top
Pin the purse top to the purse body and stitch in place. Press flat.


Step 6: attach fabric to the zipper
Cut your zipper to a length a little longer than the length of the purse lining. Cut it from the end with the zipper pull, but be careful not to let the zipper pull come off the end as it's a pain to get back on. (Yes, it came off during this project and I had to pry off the metal thing at the bottom to get it back on again) It would be sensible to put a pin in the end to make sure it doesn't happen. Feel free to learn from my stupidity. :)


Lay one of your lining pieces face up on the table. Lay the zipper on top, also right side up. the zipper ends should hang over each end of the fabric as pictured below. Don't pin yet.


Lay one of your body pieces face down on top of the zipper and lining piece.


 Line up the fabric and zipper tab carefully at the top and pin into place along the length. Don't worry if the curved bottom edges of the body and lining don't match up as you won't be sewing these bits together anyway.
In the picture below, I have pulled back the main body pieces so you can see the zipper sandwiched between the lining and the body.


zipper sandwiched between lining and body fabric
Using the zipper foot on your machine, carefully stitch along the length. You don't have to sew super close to the zipper teeth for this project as the zip sits on top of the purse. Also, I find if I sew too close then the zip gets caught in the lining all the time which makes it a pain to use.


Tip: This has made sewing zippers heaps easier for me: Start at the end of the zip with the metal closure and the zip pulled up completely. When you have sewn about 3/4 of the distance, stop with the needle in the fabric, lift the zipper foot off the fabric (the needle will hold it in place) find the zipper pull and carefully slide it up to the other end. this allows you to do the other end of the zipper easily without the pesky pull being in the way. Genius.
After sewing, press the fabric so it sits flat against the zipper. You can top stitch too if you like. In this picture, i haven't pressed it or top stitched it which is why it looks a bit dodgy.


Repeat this whole process again with the other lining piece and body piece:
Lay the lining piece face up, put the zipper on top, right side up. Line it up properly. This pic is just to highlight what it would look like underneath.


 Lay the other body piece on top, pin into place. Both of your outer body pieces should be right sides together as you can see below.


At this stage, I find it easier to open the zipper so the pull is at the opposite end to where you start sewing. you can then use the same tip above to sew the two fabric pieces to this side of the zipper tab.


Here's what you'll have.

outside pieces

lining pieces
Step 7: sew it together
Yay! We're almost there! The scary zipper part is over. woo!


Important: before pinning, pull the zipper across halfway or you won't be able to turn it out the right way. 


So now we need to sew the two body pieces and the two lining pieces together.  
Pin the two body pieces right sides together.
Pin the two lining pieces right sides together, leaving a gap of about 4 or 5 cm (2") in the bottom so we can pull it through the right way later.
In the picture below, the gap is marked with a bobby pin.
In this picture you can see the zipper ends poking out of each end. When you put the lining and body pieces together, the zipper will need to be adjusted so the tabs are sitting flat on top of each other, facing the same direction (if that makes sense). I find it makes it easier to sew them down and looks neater when you turn it the right way.


pin around the whole thing leaving a gap in the lining to pull it all through
 Sew around the perimeter of the purse. choose a method below-


A (easiest)
Starting next to the gap you have left in the lining, stitch all the way around the perimeter of the purse, carefully going over the zipper ends, and stopping at the gap in the lining at the other end.


B (still easy but probably not explained very well...)
First I sew around the body. Starting in the middle of the bottom, i work my way around to one of the zipper ends. I go over the zipper and stop just beyond it on the lining side. Then, I flip the purse over and repeat on the other side of the body piece.
- Repeat this process on the lining side, extending the stitches to just beyond the zipper tab on the body piece. this way, you have sewn over the zipper end twice which makes it stronger.
Method B also allows you to change thread colour more easily as there is a gap in your sewing when you change sides, but either method would work well.


Note: Take care when you go over the zipper end with the metal fastener. it will be close to the seam allowance so take care you don't hit it with your machine needle.


sew around the perimeter of the purse
Trim the excess zipper and clip your curves so they sit nicely when pulled through the right way.
Now this is the fun part. Put your hand (or fingers if you made the gap too small eep!) into the gap in the lining and pull the body of the purse through the opening.


 Keep pulling until it's right side out.


Use a chopstick to poke out the corners of the zip and the curves of the purse body and lining.
Slipstich closed the gap in the lining and press the whole thing flat.


Hooray! You've made a cute little purse for your coins, lip gloss, minties, Chiuaua..... maybe not. 


front


back
I hope you found this tutorial helpful and fun. I'd be happy for some feedback if you think it needs some work.


Now go and make one for your favourite friend! Yay!


X


Photobucket


Related Posts Plugin for WordPress, Blogger...