Showing posts with label home decor. Show all posts

First market stall - what I have learned so far

I have been super quiet on my blog in the last few weeks as I prepare for my first market stall coming up in 1 week + 1 day. I have learned a lot from the process and thought I'd reveal some of these things in order to perhaps help anyone else there thinking they're ready to have their own stall:


Things I have learned in preparing for my first market stall
  1. Yes, booking yourself in for a market stall in 1.5 months will be a good motivator to get organised. However.....
  2.  1.5 months is nowhere near as long as you think.... or enough time to build stock from scratch
  3.  Faffing around making a logo for 3 weeks is not encouraged and should be considered before you even book a market stall
  4.  Cutting fabric and ironing on interfacing will be the bane of your existence and takes 3 times longer than you expect it to
  5. Deciding to do a market stall during a time when you have two away trips for work is not advised
  6. Drinking wine while sewing at night is not a winning combination
  7. Buying every pink piece of fabric you're attracted to will result in a very pink market stall, leaving you scrambling one week out to make things in blues, greens and purples
  8. organising business cards and paper bags for your goods in advance will help you to stress less.
Ok so during this whole process I have taken things pretty much in my stride and things have been going pretty well. That is until I realised last night just how much pink I have in the collection and not a lot else. Eeep!

I have a little time left and some ideas, along with the support of my amazing husband who even offered to iron on interfacing for me which is so sweet (he has no idea how dull it is...).

So I better get back to it, here's some pics so you can see where I'm at so far (pink land, apparently!) Thanks go of course to Karl for taking pics and making my things look pretty!

cosmetic bags


vinyl covered coin purses


14" cushions


So that's most of what I have so far. I also have a few pencil cases and I'm trialling some headbands at the moment. Hopefully I can get everything done in time!

wish me luck!

Paris fabric cushions

I visited Paris over Christmas time about 8 years ago and simply loved the city. It's everything you dream it would be plus a magic you weren't counting on. There's a reason the cliche about falling in love in Paris exists, but no-one tells you the love you have is for the city itself. :)

Anyhoo luckily for me you can find all sorts of accessories and home wares to put a little bit of Par-ee into your life and there's plenty of French themed fabric out there too.

One of my favourites is a lovely Eiffel Tower fabric from Michael Miller. A while ago I used the red printed fabric to make some cushions for friends who really liked them. I decided to buy some more in red and black to make little cushions to sell at the market stall I have coming up at the end of the month. I backed each cushion with a plain black polka dot. Here's a pic:

Eiffel Tower fabric cushions

So far I have made 5 black and have cut fabric for 4 red cushions. If you'd like to make your own, I followed this great little video tutorial from Brett Bara's website the Manhattan Craft room. It was pretty easy and cushions would make nice gifts for Christmas I think. Brett also has a nice little book called 'Sewing in a straight line' which I'd like to check out too.

What French themed home wares do you have?

Crafty birthday presents

Lately I have spent more time making things for people for their birthdays than trawling the shops to find something. Luckily, I have lovely and encouraging friends and family members who graciously accept whatever dodgy experimental crafty piece I have made them.

This week it's one of my oldest friend Mandy's 30th birthdays and I wanted to make her a couple of different things using one of my favourite fabric lines, 'it's a hoot' by MoMo for Moda fabrics. it's bright and a bit retro looking and uses lots of pink which is my friend's favourite colour. I went for a cute little tote bag and a fabric covered canvas.

Here is the tote bag I made using one fat quarter piece:

Mandy is a Kindergarten teacher and I thought she might use it to take a few books or bits and pieces to school with her. The girls in her class would probably like the colours and print with the pretty birds etc. Since i only had one fat quarter I backed it with denim and lined it with some pink cotton.
I used interfacing and some fusible fleece to give it some body and I boxed the corners to give it a little base. To finish, I added straps, a loop and a fabric covered button for the clasp. I filled the bag with some goodies I thought Mandy would like- chocolates, hand cream and a beautiful smelling candle.

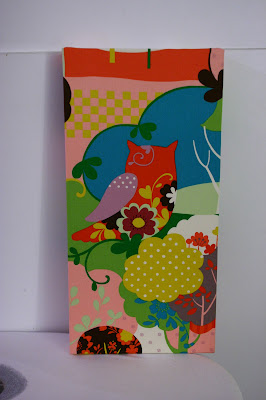
Next task was to make fabric canvas wall art using some heavier fabric from the 'it's a hoot' range. Here's how it turned out:


I love love LOVE the owl and all the cool retro trees. I'm definitely making one of these for myself one day soon!
If you want to make your own fabric canvas art, it's pretty straight forward. I looked at tutorials online but worked it our fairly easily myself.

Materials:
  • fabric
  • a canvas stretched over wooden frame
  • staple gun
  • scissors or a rotary cutter

iron your fabric and position your canvas face down over the area you would like featured in your wall hanging. Cut out the fabric generously so you can staple it easily to the frame.


Starting on one long end, staple the fabric to the canvas. repeat on the opposite side, gently stretching the fabric across so it is nice and smooth.

Staple the shorter ends, folding up the corners similar to how you would wrap a present. (You can probably find a tutorial for doing this part perfectly but I'm impatient and just had a go at it).

To make it look a bit neater at the back, I used double sided tape to stick the raw edges to the canvas frame. If you were making them to sell, you would probably need to either work out how to do it perfectly neatly, or cover the back with cardboard (which I have seen and looks good).

To hang on the wall you can use a picture hook, or put small nails on either side and attach some string or thin wire. 


Too easy! this is a great way to display your favourite fabrics, and if you're making one for a friend, you can customise it to suit their taste or the colour scheme in their house.

Happy crafting times!

embroidery hoop wall art- tutorial

 I love the idea of displaying your favourite pieces of fabric in your home as cushion covers, curtains and as wall art. A simple (and inexpensive) way of doing this is by using wooden embroidery hoops. These can be found in places like Spotlight and Lincraft, but more cheaply on Ebay.

Here is an example of embroidery hoop wall art I found over at ohdeedoh.  I love the quirky combination of fabrics and the way they frame the mirror.  


After being inspired, I decided to try and make my own embroidery hoop wall art as a gift for a friend's birthday and thought a little tutorial might help to illustrate just how easy it is.

Materials:
  1. embroidery hoop, any size you like 
  2. cute fabric
  3. fabric fray stop (optional)
First, take the inside ring of your embroidery hoop and place it over the area you would like to feature in your frame.

Cut around it generously. I used a rotary cutter and left about 1 inch. this enables you to stretch it more easily and get it into the exact position you want.


place inside ring on fabric, cut around it generously
 
Put the fabric over the inside ring and pop the outside hoop on top. Position the fabric and tighten the knob until the fabric is taut between the two rings. You will probably need to pull it at various points around the ring to smooth out some of the 'bubbles' that appear.


 stretch the fabric taught with your fingers
 
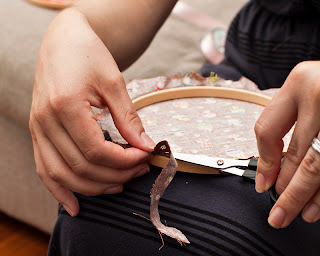
When you're happy with it, trim the excess fabric from the ring close to the hoop edge. At this point, I also ran some fabric fray stop over the fabric edge, but I guess you could also use some thin tape to cover it up.


trim fabric close to the edge

Attach a piece of ribbon or twine at the top for hanging and you're done!
 You can customise them for anyone's taste which is nice. My friend likes all things cute and Japanese. I hope she likes them!


embroidery hoop wall art ready to hang!
I am looking forward to making some for myself! Happy crafting! x


Transformation Thursday

Related Posts Plugin for WordPress, Blogger...