Recently I had a go at making a boring blue singlet look more interesting by adding a cute little ruffle with a fabric panel on top. The results can be found
here in an earlier post when I was in 'experimenting' mode. It turned out pretty well I thought, so I decided to make a little tutorial to show you how easy it is to add a ruffle to your singlet/tank top.
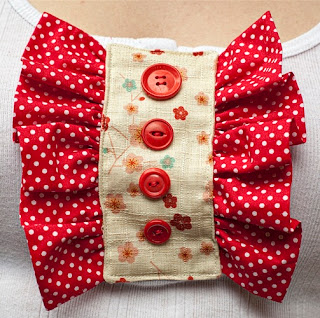
Here is a picture of the final result:
Materials:
- boring, plain singlet/tank top
- fabric strips for ruffle (length and width to suit your desired ruffle)
- contrasting fabric strip for middle panel
- buttons, ribbon or other additions of your choice
 |
| gather your materials |
Step one: measure your tank top
First thing to do is to measure the length of the area you would like the ruffles to go. Mine will be covering up some buttons and is 5 inches long (12.5cm).
 |
| measure the length of desired ruffle |
Take this measurement and times by 2 to allow for the fabric to gather into a ruffle.
My final measurement is therefore 10 inches (25cm).
Next we need to work out how wide we would like each ruffle to be. I measured from the middle of the buttons (as this is the centre of the singlet) and got 2.5 inches (6.25cm)
 |
| measure desired width from middle of singlet |
Take this measurement and times by 2, then add seam allowance, (1/2 an inch/1cm or so) to your width.
My width was therefore 5.5 inches in total (about 14cm)
N.B You probably know your own seam allowances so feel free to moderate and ignore me if necessary. (Please note also, I'm Australian so my understanding of inches and divisions of inches is pretty poor!)
Next we need to work out a measurement for our middle panel, which will be hiding all the raw edges of the ruffles.
The panel length will be the same as your original length (5inches/12.5cm) + seam allowance.
The width is entirely up to you, it just needs to be wide enough to hide your raw ruffle edges. I measured my singlet and decided on a width of 2 inches + seam allowance. I don't have a photo for this step but you can work it out.
Step 2: cut your fabric
using these measurements cut out 2 ruffle pieces and 2 panel pieces.
 |
| cut out your ruffle pieces and panel pieces |
Step 3: prepare ruffle and panel
Fold ruffle pieces lengthways right sides together. pin.
place panel pieces right sides together and pin.
 |
| pin fabric |
On the ruffle pieces, stitch the short ends of each piece ONLY. Turn the ruffle pieces the right way out and press the seam and the long folded edge.
On the panel piece, stitch around all 4 sides leaving a GAP on one long side to turn it out the right way. (makes sure you backstitch at the start and finish of your gap to reinforce it.) Turn the panel piece the right way out and press the seams.
 |
| turn pieces right side out and press |
Step 4: embellish your panel piece
Stitch your buttons, ribbon or other chosen embellishment onto your fabric panel.
 |
| add your embellishments to the pane |
Step 5: make your ruffles
To make a ruffle, loosen the tension on your sewing machine to the loosest setting. Select your longest stitch. I also increase the stitch width as it helped it to gather better for me, but I'm not sure if this is the same for every machine (test it first on some scrap fabric).
Make sure you have a long tail of cotton coming out of your machine before you start sewing so you have something to pull on at the end.
Stitch along the long, raw edge of one of your ruffle pieces. Leave a long tail at the other end so you can pull it.
NB: don't backstitch at either end of your ruffle as you want to be able to pull the threads easily.
Repeat with your other ruffle.
You should now have two long ruffle pieces with long cotton tails. To really gather up your ruffle, find the top thread at each end and pull the fabric along the thread until it gathers to your desired length. Don't knot the cotton tails just yet.
 |
| gather your ruffle pieces |
Step 6: line up and stitch your pieces
Place your ruffle pieces alongside your panel piece and check the lengths. You want the raw edges of your ruffles to be completely hidden by the sides of your panel, so you may need to adjust the lengths by pulling the tails again.
When you're happy with the lengths, tie a knot in each end of the ruffle piece to hold them in place.
 |
| line up and adjust ruffle to fit under panel |
You can see my ruffles are curved because of the gathering. don't worry, you can pin it straight and it will sit in place nicely with the panel on top.
Time to stitch it onto your tank top!
Place your ruffles on your tank on either side of the centre. Don't pin. Mine sit on either side of the row of buttons like so:
 |
| Place ruffles onto singlet |
Place your fabric panel on top and pin around the outside, trapping the ruffles carefully underneath.
 |
| Pin panel to singlet |
Top stitch around the edge of the fabric panel. (don't forget to put your tension and stitch length back to its normal position before you start).
Give your panel and the ruffles a little press. Done!
This is totally customisable for any size singlet and would be cute for a little girl's top too. The possibilities are endless with fabric type and embellishments and also length of ruffles and type of top you use too.
I hope you enjoyed this tutorial, feedback is always welcome!


