Lately I have spent more time making things for people for their birthdays than trawling the shops to find something. Luckily, I have lovely and encouraging friends and family members who graciously accept whatever dodgy experimental crafty piece I have made them.
This week it's one of my oldest friend Mandy's 30th birthdays and I wanted to make her a couple of different things using one of my favourite fabric lines, 'it's a hoot' by MoMo for Moda fabrics. it's bright and a bit retro looking and uses lots of pink which is my friend's favourite colour. I went for a cute little tote bag and a fabric covered canvas.
Here is the tote bag I made using one fat quarter piece:
Mandy is a Kindergarten teacher and I thought she might use it to take a few books or bits and pieces to school with her. The girls in her class would probably like the colours and print with the pretty birds etc. Since i only had one fat quarter I backed it with denim and lined it with some pink cotton.
I used interfacing and some fusible fleece to give it some body and I boxed the corners to give it a little base. To finish, I added straps, a loop and a fabric covered button for the clasp. I filled the bag with some goodies I thought Mandy would like- chocolates, hand cream and a beautiful smelling candle.
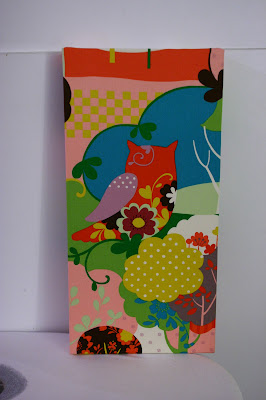
Next task was to make fabric canvas wall art using some heavier fabric from the 'it's a hoot' range. Here's how it turned out:
I love love LOVE the owl and all the cool retro trees. I'm definitely making one of these for myself one day soon!
If you want to make your own fabric canvas art, it's pretty straight forward. I looked at tutorials online but worked it our fairly easily myself.
Materials:
- fabric
- a canvas stretched over wooden frame
- staple gun
- scissors or a rotary cutter
iron your fabric and position your canvas face down over the area you would like featured in your wall hanging. Cut out the fabric generously so you can staple it easily to the frame.
Starting on one long end, staple the fabric to the canvas. repeat on the opposite side, gently stretching the fabric across so it is nice and smooth.
Staple the shorter ends, folding up the corners similar to how you would wrap a present. (You can probably find a tutorial for doing this part perfectly but I'm impatient and just had a go at it).
To make it look a bit neater at the back, I used double sided tape to stick the raw edges to the canvas frame. If you were making them to sell, you would probably need to either work out how to do it perfectly neatly, or cover the back with cardboard (which I have seen and looks good).
To hang on the wall you can use a picture hook, or put small nails on either side and attach some string or thin wire.
Too easy! this is a great way to display your favourite fabrics, and if you're making one for a friend, you can customise it to suit their taste or the colour scheme in their house.
Happy crafting times!


Oooh super cute canvas! I am so in love with this fabric collection! I almost dont want to cut into it! Lol Love the bag too!
ReplyDeleteThe bag is so perfect I love using it!
ReplyDeleteGreat size and shape- I can easily fit my drink bottle, snacks purse etc.
Thanks clever lady xxx